The sun is bright, the water is calm, and you’re excited to spend the day on the lake on your boat. As you fill up your fuel tank, you start to wonder if it’s in good condition.
After all, a leaking tank might be hazardous to your safety, not to mention ruin your day on the lake. So, how do you know your boat’s fuel tank is safe to use? The answer is straightforward: pressure testing.
You need to gather the necessary tools, prepare the tank, disconnect fuel lines, and close off vent lines and other connections. These steps are crucial to create a controlled testing environment and ensure accurate results. But this is not the end; you must take a few steps.
Following this instruction will teach you how to pressure test your boat’s fuel tank and discover any problems. From gathering equipment to removing gasoline lines and cutting off connections, each step prepares the way for a comprehensive inspection. So let’s get started!
Read Related Articles:
Why Should You Pressure Test Your Boat Fuel Tank?
You’re out on the water, surrounded by magnificent scenery, having a great time boating. The last thing you want is for that peace to be disrupted by a gasoline tank problem. This is when pressure-checking your boat’s gasoline tank comes in handy.
Ensuring Safety on the Water:
When it comes to boating, safety should always be a top priority. A compromised fuel tank can pose serious risks, ranging from fuel leaks to engine malfunctions, potentially leaving you stranded in the middle of the water.
By pressure testing your boat’s fuel tank, you can identify any leaks or weaknesses before they escalate into major problems. This preventive measure ensures you’re not caught off guard, giving you peace of mind as you navigate the open seas.
Protecting the Environment:
Boaters have a responsibility to protect the environment they cherish. A leaking fuel tank can lead to fuel contamination, posing a threat to marine life, ecosystems, and the overall water quality.
Pressure testing helps detect even the smallest leaks, allowing you to take prompt action and prevent fuel from entering the water. You actively protect the beauty of our seas, lakes, and rivers by proactively resolving any concerns.
Maintaining Fuel Efficiency:
Fuel efficiency is not only environmentally friendly but also economically beneficial. A well-maintained fuel tank ensures optimal fuel usage, maximizing your boating experience while minimizing costs.
Pressure testing helps identify leaks or weaknesses that may cause fuel wastage, allowing you to address them and ensure efficient fuel consumption. By eliminating fuel system inefficiencies, you’ll get the most out of every drop of fuel, extending your time on the water without constantly worrying about refueling.
Preventing Catastrophic Failures:
Cruising at high speeds, enjoying the thrill of the open water, when suddenly your boat’s engine sputters and dies. Catastrophic failures like this can occur due to fuel tank issues, including leaks or pressure imbalances.
Pressure testing your boat’s fuel tank serves as a proactive measure to catch these problems early on. By detecting potential failures before they happen, you can avoid dangerous situations and protect yourself, your passengers, and your vessel from harm.
Meeting Regulatory Standards:
Boating regulations and safety standards vary from region to region, but many jurisdictions require periodic fuel tank inspections. Pressure testing your boat’s fuel tank helps ensure compliance with these regulations.
By staying on top of inspection requirements and maintaining a well-tested fuel system, you can enjoy worry-free boating adventures without the fear of penalties or violations.
What Tools Do You Need for Pressure Testing?
Before embarking on the process of pressure testing your boat’s fuel tank, it’s crucial to gather the necessary tools to ensure a successful and accurate inspection. Now, we’ll explore the essential tools you’ll need for pressure testing and discuss their specific roles in the testing process.
Pressure Gauge:
A reliable pressure gauge is a fundamental tool for pressure testing your boat’s fuel tank. It detects the pressure within the tank and allows you to monitor and maintain a consistent pressure level throughout the testing procedure.
Choose a high-quality pressure gauge that is compatible with your tank’s pressure range and provides accurate readings. Remember to follow the manufacturer’s directions for appropriate calibration and operation.
Plugs and Stoppers:
To close off all openings in the fuel tank during the pressure test, you’ll need plugs and stoppers of appropriate sizes. These plugs seal fuel lines, vent lines, and other connections, ensuring an airtight environment for accurate testing.
Use plugs made from materials suitable for fuel compatibility, such as neoprene or rubber, to prevent any leaks or damage during the pressure testing process.
Hose Clamps:
Hose clamps are essential for securing and tightening the plugs and stoppers in place. They help create a secure and leak-proof seal, ensuring no air or fuel escapes during the pressure test.
Choose stainless steel hose clamps that are resistant to corrosion and provide a reliable grip. Ensure the clamps are properly tightened to prevent leaks or pressure loss.
Pump or Compressor:
A pump or compressor is necessary to apply pressure to the fuel tank during the testing process. Depending on your boat’s fuel tank size, you can pick between manual pumps, electric pumps, and air compressors.
Select a pump suitable for your tank’s pressure requirements and can provide consistent and controlled pressure throughout the test.
Sealant and Thread Tape:
Sealant and thread tape are valuable tools for ensuring an airtight seal during the pressure test.
Apply a suitable fuel-resistant sealant or thread tape to the threads of plugs and fittings to enhance their sealing capabilities.
This additional layer of protection helps prevent any potential leaks and ensures a reliable pressure testing process.
Safety Equipment:
While not directly related to the pressure testing itself, safety equipment is crucial during the entire process. Ensure you have appropriate safety gear, such as gloves and eye protection, to protect yourself from potential fuel spills or accidents. Additionally, keep a fire extinguisher nearby as a precautionary measure.
How to Prepare Your Boat Fuel Tank for Pressure Testing?
Before conducting a pressure test on your boat’s fuel tank, proper preparation is key to ensuring accurate results and a safe testing environment.
Step 1: Gather the Necessary Tools and Materials:
Before preparing your fuel tank, gather all the tools and materials you’ll need. Refer to the above section to ensure you have the appropriate tools, such as plugs, stoppers, hose clamps, a pressure gauge, a pump or compressor, sealant, and safety equipment.
Step 2: Ensure Proper Ventilation:
To prepare your fuel tank for pressure testing, ensure you’re working in a well-ventilated area. Open any hatches or access points that allow fresh air to circulate inside the boat’s engine compartment or storage area where the fuel tank is located. Proper ventilation helps dissipate any fumes or vapors, ensuring a safer testing environment.
Step 3: Disconnect Fuel Lines:
Before closing off the fuel tank, disconnect any fuel lines connected to it. This includes both supply lines and return lines. Use caution and follow the appropriate safety precautions when handling fuel lines to minimize the risk of fuel spills or accidents. Ensure all connections are properly sealed to prevent fuel leakage during the pressure test.
Step 4: Close Off Vent Lines and Other Connections:
Once the fuel lines are disconnected, close off all vent lines and other connections on the fuel tank. Use the appropriate plugs or stoppers of suitable sizes to seal these openings securely. Apply a fuel-resistant sealant or thread tape to the threads of plugs and fittings to enhance their sealing capabilities.
Step 5: Securely Clamp the Plugs and Stoppers:
After inserting the plugs or stoppers into the fuel tank’s openings, use hose clamps to secure them tightly in place. Ensure that the clamps are properly tightened to create an airtight seal. Double-check each plug and stopper to verify that they are securely fastened and will not loosen during the pressure test.
Step 6: Inspect and Clean the Tank:
Before proceeding with the pressure test, take a moment to inspect the fuel tank for any signs of damage, corrosion, or debris.
Clean the exterior of the tank using mild detergent and water, ensuring that no dirt or contaminants could interfere with the pressure testing process.
Additionally, inspect the tank’s internal components, such as the fuel level sensor, for any potential issues.
Step-by-Step Guide to Pressure Testing Your Boat Fuel Tank
After you’ve correctly prepped your boat’s fuel tank, it’s time to begin the pressure testing process. This tutorial will follow you through each stage of the process, ensuring you can conduct a complete check and discover any leaks or flaws in your gasoline tank.
Step 1: Safety First:
Before proceeding with the pressure test, prioritize safety. Wear adequate safety equipment, like gloves and eye protection, to protect yourself from any gasoline spills or mishaps. Keep a fire extinguisher nearby as a precautionary measure.
Step 2: Connect the Pressure Gauge:
Attach the pressure gauge to a suitable location on the fuel tank, preferably at a convenient access point. Ensure that the gauge is securely connected and properly calibrated according to the manufacturer’s instructions.
Step 3: Set the Desired Pressure:
Refer to your boat’s manufacturer guidelines or consult a professional to determine the appropriate pressure range for your fuel tank. Set the desired pressure on the pump or compressor, ensuring that it falls within the recommended range.
Step 4: Apply Pressure:
Begin by slowly applying pressure to the fuel tank using the pump or compressor. Monitor the pressure gauge closely and make adjustments as necessary to maintain a consistent pressure level.
Step 5: Inspect for Pressure Drop:
Once the desired pressure is reached, observe the pressure gauge for any significant drop in pressure over a specified period. A sudden drop in pressure indicates a potential leak in the fuel tank or its components. Take note of any changes and record the results for further analysis.
Step 6: Visual Inspection:
While the pressure is maintained, visually inspect the fuel tank and its connections for any signs of leaks, cracks, or damage. Pay close attention to areas such as welds, seams, fittings, and fuel lines. Use a flashlight if needed to examine all surfaces thoroughly.
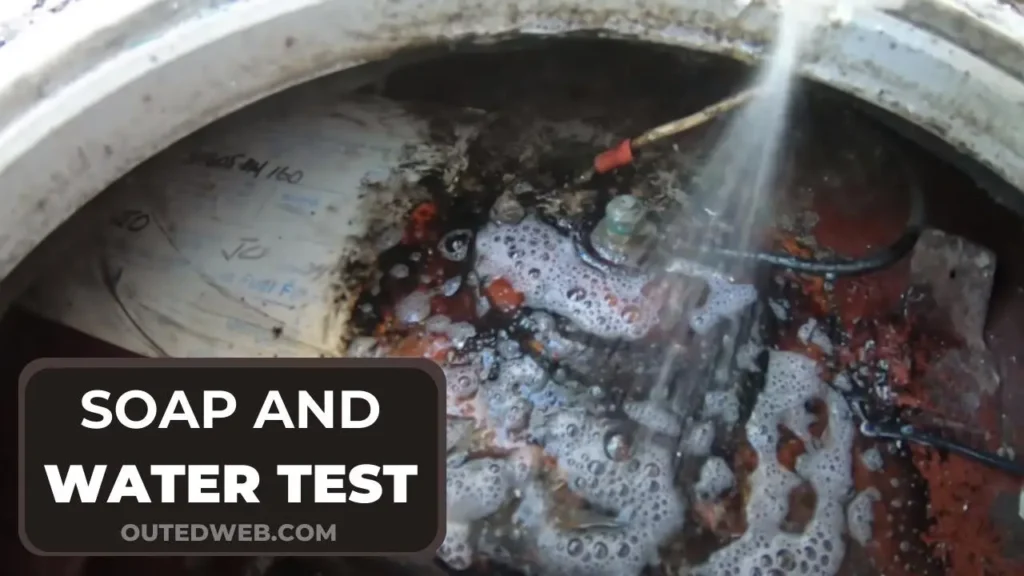
Step 7: Soap And Water Test:
To further detect any leaks, create a soapy water solution by mixing dish soap with water. Apply the solution to the fuel tank’s connections, fittings, and other potential leak points. Observe closely for any bubbling or foaming, as it indicates the presence of a leak. Take note of the location of any leaks for future repairs.
Step 8: Record and Analyze Results:
Throughout the pressure testing process, document the pressure readings, any observed pressure drops, visual inspection findings, and the soap and water test results. Analyze the data to identify patterns or areas requiring immediate attention or further investigation.
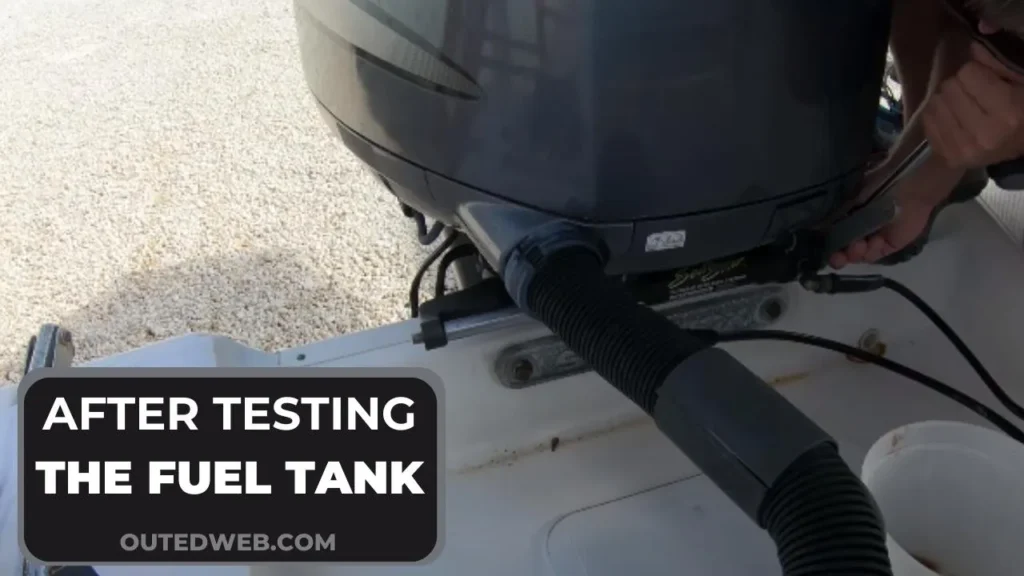
Step 9: Addressing Identified Issues:
If any leaks or weaknesses are detected during the pressure test, take appropriate action to address them. Depending on the severity of the issue, this may involve repairs, component replacements, or seeking professional assistance.
Ensure that all repairs are performed following recommended safety guidelines and in compliance with applicable regulations.
Common Issues and Troubleshooting Tips
While pressure testing your boat’s fuel tank effectively identifies leaks and weaknesses, it’s essential to be prepared for common issues that may arise during the process.
Pressure Loss:
One common issue encountered during pressure testing is a gradual or sudden loss of pressure. This can indicate a leak in the fuel tank or its components. Troubleshooting steps include:
- Check all connections: Ensure plugs, stoppers, and fittings are securely tightened and properly sealed. Use soap and water solution to detect any visible leaks and tighten or repair as necessary.
- Inspect fuel lines: Examine the fuel lines for cracks, loose connections, or deteriorated hoses. Replace any damaged components.
- Verify pressure gauge accuracy: Ensure the pressure gauge functions correctly and calibrates appropriately. Replace if needed.
Difficulties in Holding Pressure:
If your fuel tank struggles to maintain pressure during testing, consider these troubleshooting tips:
- Check for external factors: Examine the fuel tank’s surroundings for potential sources of pressure loss, such as open vents, loose caps, or faulty seals. Rectify any issues to ensure an airtight testing environment.
- Inspect valves and vents: Check the fuel tank’s valves and vents for obstructions or malfunctions—clean or repair them as necessary.
- Evaluate pump or compressor: Assess the pump or compressor for proper functionality, ensuring it can maintain consistent pressure levels. Repair or replace if needed.
False Positives or Negatives:
Occasionally, pressure testing may yield false results. Consider these troubleshooting tips to minimize the chances of inaccurate readings:
- Repeat the test: If a result seems questionable, repeat the pressure test to confirm the findings. This helps eliminate any potential errors or inconsistencies.
- Perform visual inspections: Conduct a thorough visual inspection of the fuel tank, connections, and components. Look for signs of leaks or damage that may not be apparent during the pressure test.
- Seek professional assistance: If you’re unsure about the accuracy of your findings or encounter persistent issues, consult a professional marine technician for further evaluation and guidance.
Safety Concerns:
During the pressure testing process, it’s crucial to prioritize safety. Here are some tips to ensure a safe testing environment:
- Follow safety protocols: Adhere to safety guidelines, including wearing appropriate protective gear, having a fire extinguisher nearby, and working in a well-ventilated area.
- Handle fuel with care: Take precautions when handling fuel and fuel lines to prevent spills or accidents. Avoid smoking or open flames in the vicinity.
- Be mindful of fuel vapors: Fuel vapors can be hazardous. Avoid inhaling excessive fumes and ensure proper ventilation during testing.
Final Say
Pressure-checking your boat’s fuel tank guarantees your vessel’s safety and dependability. You can efficiently plan, conduct, and troubleshoot the pressure testing procedure by following the step-by-step instructions in this article.
Remember to gather the necessary tools, properly prepare the tank, and follow safety precautions. Through careful observation, results analysis, and addressing any identified issues, you can maintain a leak-free fuel system that keeps you confident and secure on the water.
Regular pressure testing will help you catch potential problems early, allowing for timely repairs and preventing fuel-related mishaps. By prioritizing the maintenance of your boat’s fuel tank, you can enjoy worry-free boating experiences and make the most of your time on the waves.
