You’re out on the water, gliding through the gentle waves, when suddenly you notice your boat’s floor has seen better days. It’s worn, cracked, and no longer has the foundation you need. Change is needed now. But how can you bring back the luster of your boat’s floor? Fear not, for we have the answer.
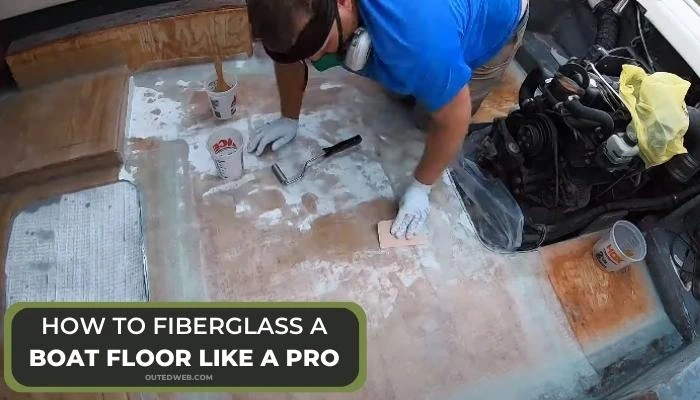
To fiberglass a boat floor, remove existing flooring, clean the surface, and wear protective gear. Cut fiberglass cloth, apply the epoxy resin with a roller, and lay the cloth over it, removing air bubbles. But hold on; we’re not done just yet.
While the initial steps are crucial, you must take a few more key measures to achieve a flawlessly fiberglassed boat floor. We’ll go into great depth about these extra stages in this guide. So let’s get started and learn about the next steps in this fascinating procedure.
Read Also:
Why Should You Fiberglass Your Boat Floor?
When it comes to maintaining your boat, the boat floor is one area that deserves special attention. Whether you’re a seasoned boater or new to the world of marine adventures, fiberglassing your boat floor can provide several significant benefits worth considering.
Enhanced Durability and Strength:
By applying fiberglass reinforcement to your boat floor, you significantly increase its durability and strength.
Fiberglass is a durable material that can endure the stresses of boating, including a lot of foot activity, accidents, and water exposure.
You may have peace of mind knowing that a floor with fiberglass reinforcement can endure the demands of your sailing excursions.
Improved Water Resistance:
One of the primary benefits of fiberglassing a boat floor is the enhanced water resistance it provides. Fiberglass is inherently waterproof, creating a protective barrier that prevents water from seeping into the floor structure.
This feature is especially important in boats, where exposure to water is constant. With a fiberglassed boat floor, you can minimize the risk of water damage, rot, and mold growth, prolonging the life of your boat.
Enhanced Structural Integrity:
The structural integrity of your boat is crucial for safety and longevity. A weak or damaged floor can compromise the overall stability of the vessel.
Fiberglassing reinforces the boat floor, making it more rigid and resistant to flexing and bending.
This added strength contributes to the overall structural integrity of the boat, providing a solid foundation for all your boating activities.
Protection against Impact and Wear:
Heavy items, foot activity, and equipment movement constantly abuse boats’ flooring. The additional layer of protection provided by fiberglass reinforcement lowers the possibility of injury from collisions and abrasions.
With a fiberglassed boat floor, you may take pleasure in your boating excursions without being concerned about ugly dents or scratches that can jeopardize the floor’s structural integrity.
Aesthetically Pleasing Finish:
In addition to the practical benefits, fiberglassing your boat floor can also enhance its appearance. Fiberglass provides a smooth, seamless finish that can give your boat floor a polished and professional look.
Whether you have a brand new boat or are refurbishing an older vessel, a fiberglassed floor can significantly improve its aesthetic appeal and overall value.
What Should You Know Before Fiberglassing A Boat Floor?
Before diving into the process of fiberglassing your boat floor, there are a few essential factors to consider. Understanding these key aspects will help ensure a successful and effective fiberglassing project.
What Kind of Fiberglass for the Boat Floor:
When it comes to fiberglassing your boat floor, choosing the right type of fiberglass material for the job is essential. Several options are commonly used, each with its own characteristics and suitability for different applications.
Fiberglass Matting:
Fiberglass matting consists of randomly oriented glass fibers held together by a binder. It is typically the most economical option and is commonly used for boat floor fiberglassing projects.
Fiberglass matting is simple, offers strong strength, and resists water well. But it might not be as aesthetically beautiful as other alternatives, and because of its thickness, it might be harder to get a clean finish.
Chopped Strand Mat (CSM):
Chopped Strand Mat, also known as CSM, is made up of short strands of fiberglass randomly dispersed and held together by a binder. It is thicker and denser than fiberglass matting, providing increased strength and rigidity to the boat floor.
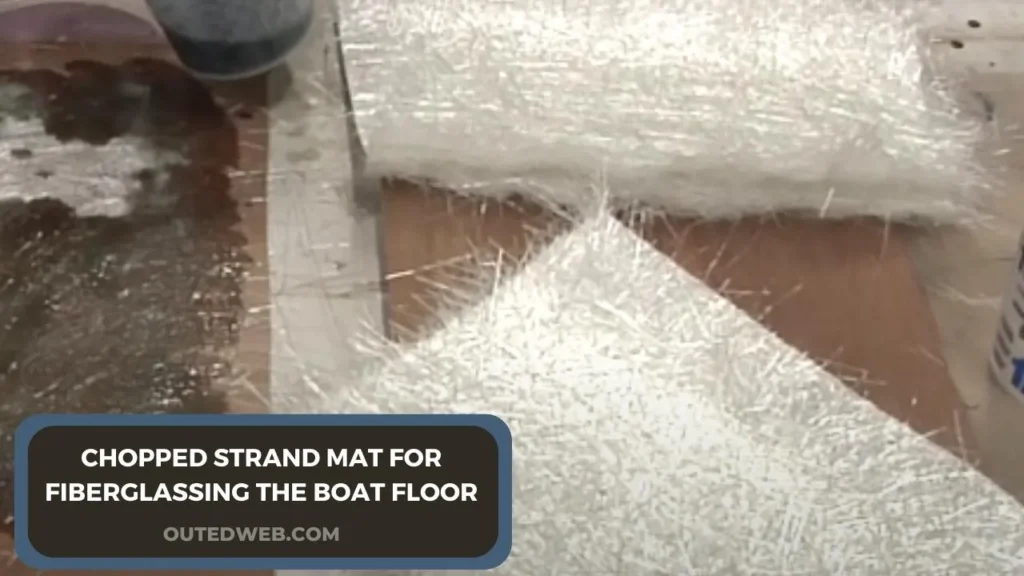
CSM is an excellent choice for areas that require extra reinforcement or where surface irregularities occur. However, it may need more resin to saturate the material fully, and achieving a smooth finish can be more challenging than other options.
Woven Fiberglass Cloth:
Woven fiberglass cloth is made of tightly woven strands, creating a strong and durable material. It is often used for applications that require higher strength, such as high-traffic areas or heavily loaded sections of the boat floor.
It provides excellent aesthetics, allowing for a smoother finish. However, it may be more expensive and requires careful attention to ensure proper saturation and adhesion.
How Many Layers of Fiberglass for the Boat Floor:
Applying multiple layers of fiberglass is crucial for achieving optimal protection and durability for your boat floor. The number of layers required depends on the existing floor’s condition and the desired reinforcement level.
The first layer of fiberglass acts as a bonding layer, adhering to the boat floor and providing a foundation for subsequent layers. Additional layers build upon this foundation, increasing the overall strength and durability of the boat floor.
For boat floor fiberglassing, applying at least two to three layers of fiberglass is generally recommended.
This provides adequate reinforcement and helps ensure that the fiberglass effectively distributes the load and withstands the demands placed on the floor.
However, additional layers may be necessary if the existing floor is in poor condition or requires significant reinforcement.
To determine the appropriate number of layers, assess the condition of the boat floor, and consider the type of fiberglass material being used.
Thicker materials, such as chopped strand mats or woven fiberglass cloth, may require fewer layers compared to thinner materials like fiberglass matting.
Also, consult manufacturer guidelines and recommendations for the specific fiberglass material you chose.
What Tools and Materials Do You Need?
The procedure will be more effective, and you’ll get the greatest outcomes if you have the correct tools. The following is a list of necessary equipment and supplies for the fiberglassing project:
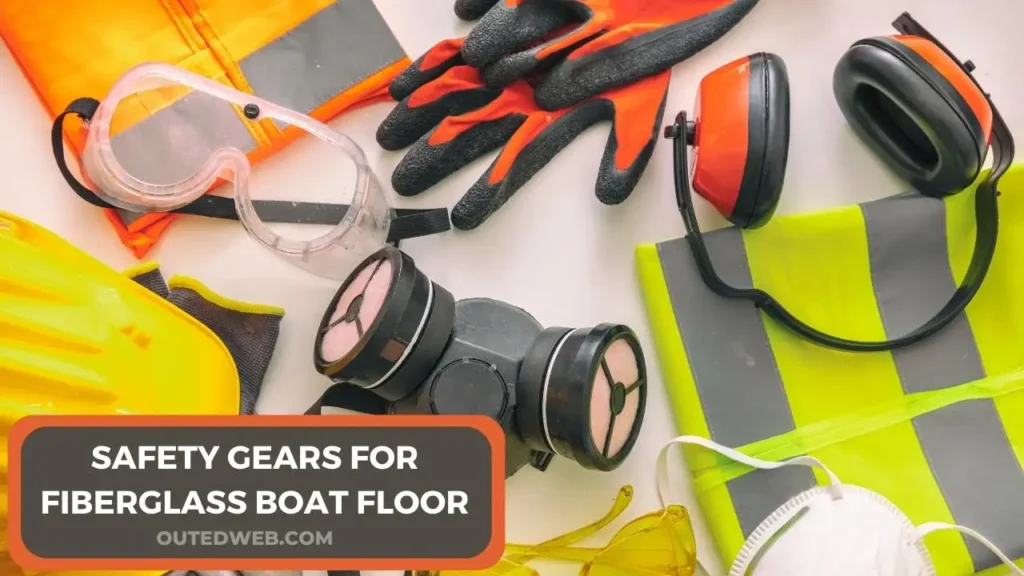
Safety Gear:
- Safety goggles: Protect your eyes from potential resin splashes or fiberglass particles.
- Respirator or mask: Prevent inhalation of harmful fumes and dust during fiberglassing.
- Disposable gloves: Keep your hands protected from resin and other chemicals.
Fiberglass Materials:
- Fiberglass matting, chopped strand mat (CSM), or woven fiberglass cloth: Choose the type of fiberglass material based on your boat floor requirements, as discussed earlier.
- Fiberglass resin: Use a high-quality marine-grade resin suitable for fiberglassing applications.
- Catalyst or hardener: This component is mixed with resin to initiate curing. Follow the manufacturer’s instructions for the recommended ratio.
- Fiberglass filler (optional): If there are any gaps or imperfections on the boat floor, a filler can be used to even out the surface before applying the fiberglass layers.
Application Tools:
- Fiberglass roller: Essential for removing air bubbles and ensuring proper adhesion of the fiberglass layers to the boat floor.
- Paintbrushes: Use disposable brushes for applying resin and catalyst, as they may become stiff and difficult to clean after use.
- Mixing containers: Use plastic or disposable containers for mixing resin and catalysts. Avoid using containers that react with or contaminate the mixture.
- Stir sticks Wooden or plastic sticks for thoroughly mixing the resin and catalyst.
Surface Preparation Tools:
- Sander or sandpaper: Prepares the boat floor by removing any existing paint, varnish, or contaminants. Start with a coarse grit (around 80–100) and gradually move to finer grits (200–400) for a smooth surface.
- Vacuum cleaner or brush: Removes dust and debris from the sanded boat floor.
- Tack cloth: Wipe the boat floor to ensure it is free of any remaining dust or particles before applying the fiberglass.
Miscellaneous Tools and Materials:
- Plastic sheeting or drop cloths: Protect the surrounding areas from resin spills and drips.
- Masking tape: Helps in creating clean lines and prevents resin from spreading to unwanted areas.
- Mixing and measuring tools: Graduated containers or scales for accurately measuring resin and catalyst ratios.
- Heat gun or torch: Used for removing air bubbles and promoting resin curing, if necessary.
- Sanding blocks: Aid in smoothing out the fiberglass layers between applications.
How Do You Prepare the Boat Floor for Fiberglassing?
Properly preparing the boat floor is crucial to ensuring a strong and durable bond between the fiberglass and the surface. Follow these steps to prepare your boat floor for fiberglassing effectively:
Clear the Area:
Before you begin, remove any loose items, equipment, or personal belongings from the boat floor. This will provide you with a clear workspace and prevent any obstructions during the preparation and fiberglassing process.
Remove Existing Coatings:
If your boat floor has any old coatings, such as paint, varnish, or gel coat, it’s essential to remove them to create a suitable surface for the fiberglass to adhere to. Carefully smooth away the current coats using a sander or sandpaper.
Begin with coarse-grit sandpaper (about 80–100), then go to finer grits (200–400) to produce a smooth surface. Make sure to uniformly sand the whole boat bottom.
Repair Damaged Areas:
Inspect the boat floor for any cracks, holes, or other forms of damage. It’s crucial to address these issues before applying fiberglass to ensure a structurally sound and waterproof surface.
Depending on the severity of the damage, you may need to perform repairs such as filling holes with epoxy putty or using fiberglass filler to even out uneven surfaces. Follow the manufacturer’s instructions for the repair products you are using and allow sufficient curing time before proceeding.
Clean the Surface:
After removing the old coatings and making any required repairs, clean the boat floor thoroughly to eliminate any dust, dirt, or pollutants.
Eliminate any loose particles using a vacuum cleaner or brush, and then wipe the whole surface with a tack cloth to eliminate any leftover dust. A clean surface is required for optimal adherence to the fiberglass layers.
Mask Off Surrounding Areas:
To protect areas adjacent to the boat floor that you don’t want the fiberglass resin to touch, use masking tape to create clean boundaries. Cover any surfaces, fittings, or objects nearby with plastic sheeting or drop cloths to prevent resin spills or drips from causing damage.
Ensure Proper Ventilation:
Fiberglass resin emits fumes that can be harmful if inhaled. It’s crucial to work in a well-ventilated area or, if possible, outdoors. Open windows, use fans, or consider wearing a respirator or mask to protect yourself from any potential health risks.
Step-by-Step Guide to Fiberglassing a Boat Floor:
It’s time to begin the primary phases of fiberglassing a boat floor after finishing the preliminary steps. As we proceed, we’ll provide you with step-by-step directions and practical advice to make sure your fiberglassing endeavor is successful.
Step 1: Cut and Lay the Fiberglass Matting or Cloth
Measure and cut the fiberglass mat or cloth to the appropriate size for your boat floor. Ensure the pieces cover the entire surface and overlap slightly at the edges for a seamless bond. Lay the cut fiberglass onto the boat floor, making sure it fits properly and lies flat.
Step 2: Mix the Resin and Hardener
Follow the manufacturer’s instructions to mix the resin and hardener in the correct ratio. Typically, the ratio is around 2 parts resin to 1 part hardener. Use distinct containers for resin and hardener to prevent contamination. For several minutes, thoroughly swirl the liquid to get a well-blended consistency.
Step 3: Apply the Resin
Using a paintbrush or roller, apply a layer of resin to the boat floor, focusing on a small section at a time. Ensure the resin is evenly distributed, saturating the fiberglass mat or cloth.
Work quickly but carefully to prevent the resin from hardening before application. Pay extra attention to the edges and corners, ensuring they are fully saturated.
Step 4: Smooth out the Fiberglass
After applying the resin, smooth away any air bubbles and guarantee adequate fiberglass adherence with a foam roller or squeegee. Working from the middle of the part outward, use mild pressure to expel any trapped air. This step helps create a strong bond and a smooth surface.
Step 5: Repeat the Process for Additional Layers
If multiple layers of fiberglass are required for added strength, repeat steps 1 to 4 for each layer. Ensure each layer is adequately saturated with resin and smoothly applied before proceeding to the next layer. Follow the recommended curing time between layers as specified by the manufacturer.
Step 6: Allow the Fiberglass to Cure
Once all the layers are applied, allow the fiberglass to cure according to the resin manufacturer’s instructions. This typically involves letting the boat floor sit undisturbed for a specified duration to ensure the resin fully hardens. Avoid walking on or placing any weight on the fiberglass during the curing process.
Step 8: Sand and Finish
After the fiberglass has cured, sand the surface using progressively finer grit sandpaper to achieve a smooth finish. Start with coarse-grit sandpaper (around 200) and gradually move to finer grits (400–800).
This step helps remove any imperfections and prepares the surface for painting or other finishing treatments.
Common Challenges and Troubleshooting:
Although fiberglassing your boat floor can be a pleasant task, it’s vital to be aware of potential difficulties that may develop during the process. The following are some typical problems that may arise with fiberglassing, along with solutions:
Air Bubbles:
Air bubbles trapped under the fiberglass can weaken the bond and create imperfections in the final surface.
To prevent air bubbles, ensure thorough saturation of the fiberglass matting or cloth with resin. Work in small sections and use a foam roller or squeegee to smooth out the fiberglass, removing any trapped air. Apply gentle pressure from the center towards the edges to achieve optimal adhesion and eliminate air bubbles.
Uneven Surface:
The fiberglass may not lay flat or adhere evenly to the boat floor, resulting in an uneven surface.
Properly prepare the boat floor by sanding and cleaning it thoroughly before applying the fiberglass. Ensure the boat floor is free from any debris, grease, or old adhesive that could hinder adhesion.
Additionally, use a foam roller or squeegee to smooth out the fiberglass as you apply it, ensuring an even distribution of resin and proper adhesion.
Excessive Resin or Hardener:
Using too much resin or hardener can lead to issues such as improper curing, extended drying times, or a weak final product.
Follow the manufacturer’s instructions carefully when mixing the resin and hardener, ensuring the correct ratio is maintained. Avoid overloading the fiberglass with excessive resin, as it can lead to pooling and uneven curing.
Use a scale or measuring container to measure the resin and hardener components for consistent results.
Poor Adhesion:
If the fiberglass does not adhere properly to the boat floor, it may result in delamination or weak spots.
Ensure that the boat floor is clean, dry, and free from any contaminants that could hinder adhesion. Properly sand and clean the surface before applying the fiberglass.
Additionally, ensure that each layer of fiberglass is thoroughly saturated with resin, paying close attention to the edges and corners. Apply gentle pressure using a roller or squeegee to promote proper adhesion.
Curing Issues:
Improper curing can lead to a weak or tacky surface, compromising the durability and finish of the fiberglass.
Follow the resin manufacturer’s instructions regarding curing time and environmental conditions. Ensure that the workspace is well-ventilated and in the recommended temperature range for proper curing. Avoid disturbing or applying pressure to the fiberglass during the curing process to allow it to harden uniformly.
How Much Does Fiberglass Boat Flooring Cost?
The cost of fiberglass boat flooring varies based on many criteria, including the size of the boat, the condition of the existing floor, the grade of materials used, and whether you want to handle the installation yourself or employ a professional. Here’s a summary of the prospective costs:
Fiberglass:
The cost of fiberglass materials for boat flooring typically includes fiberglass matting, chopped strand mats (CSM), woven fiberglass cloth, and the necessary resin and hardener.
The cost of fiberglass material might range between $2 and $6 per square foot. Higher-quality materials may be more expensive, but they can provide greater strength and longevity.
Tools and Equipment:
To finish the fiberglassing process, you will need various tools and equipment, including sandpaper, rollers, brushes, mixing bowls, and safety gear like gloves and goggles. Depending on the brand and quality, these gadgets might cost anywhere from $50 to $200.
Additional Materials:
In addition to fiberglass materials, you may require other materials, such as marine-grade plywood or foam core, to provide structural support or insulation beneath the fiberglass. The cost of these materials will depend on the size and specific requirements of your boat floor.
Professional Installation:
The price of hiring a specialist to fiberglass your boat floor may drastically vary based on the boat’s size, the operation’s complexity, and labor prices in your area. Depending on the scope of the repair, professional installation fees may range from $1,500 to $5,000 or more.
It is critical to remember that these cost estimates are simply predictions and may vary depending on your location and project details. Prices may also change over time owing to market circumstances and material availability.
Factors that can influence the overall expense include the condition of the boat floor, the need for any repairs or modifications, the desired level of reinforcement, and the choice of additional features such as non-skid surfaces or custom finishes.
To determine an accurate cost estimate for your fiberglass boat flooring project, it is recommended to consult with local suppliers for material prices and obtain quotes from professionals if you plan to hire their services.
Final Say
Fiberglassing your boat floor offers numerous advantages, including increased strength, durability, and protection against water damage. By selecting the appropriate fiberglass materials, preparing the boat floor properly, and following a step-by-step process, you can achieve a high-quality fiberglass floor.
While there may be challenges along the way, such as air bubbles or uneven surfaces, troubleshooting techniques can help overcome these issues. When it comes to cost, fiberglass boat flooring expenses can vary based on materials, tools, and whether you choose professional installation.
However, the long-term benefits and improved performance make fiberglassing a worthwhile investment for boat owners seeking a reliable and resilient flooring option.
